This post includes mentions of sponsored products and affiliate links, from which I may make a small commission if you purchase products through the affiliate link.
If you’ve been following along on Instagram, you’ll know this kitchen renovation has been in the works since November. We were settled on nearly all of the materials by January, began demo in late March, and are just now at the cabinet-building stage. I will be writing three more blogs on this kitchen series: the next will focus on cabinetry, hardware and counters. The third will discuss appliances, fixtures and lighting, while the final reveal will offer details and links for the entire kitchen.
This first blog in the kitchen series will be broken down into two sections: in the first section I will share where we started and the moodboard, plus a discussion of how I designed the space and why I made the choices I did. The second section will focus on the installation of the heated floors and the Divine Flooring Vernazzo herringbone floors.
WHERE WE STARTED/WHY WE ARE RENOVATING
The first thing I’ll say is that I will only buy homes where I absolutely hate the kitchen. Kitchens are by far my most favorite room to renovate, and I would simply never demolish a high-quality kitchen. So, a fixer-upper with a terrible kitchen are absolutely essential boxes for us to check with any potential home purchase. With this home, the range was broken, our cabinetry was nearly 40 years old (and falling apart), the tile floor was really gross and our refrigerator was essentially one big 40 year-old freezer that froze EVERYTHING.
We knew everything needed to be replaced, but we wanted to live with the space for a while to really understand how our family needed it to function (something I highly recommend regarding any major renovation). I am so glad we chose to do this because the changes we ended up making are not things I would have thought of when we first moved in. We decided to eliminate our butler’s pantry and move the existing powder room to that space to make the kitchen less choppy and really open up the space. We also decided to move our basement stairs (which were in the kitchen) to another area of the house, and use this space as a walk-in pantry.
I am also glad that we lived with this black tile for over a year because it really made me understand how much I dislike tile in this space. For one, it’s extremely cold underfoot in these Chicago winters. Secondly, the dark tile would get so dirty SO FAST. Within an hour of cleaning our floors they would look like the floor of a rainforest. The last reason I didn’t love the tile is that it just didn’t feel great underfoot when standing for long periods of time to wash dishes or cook. I wanted flooring that would be a little more gentle on my back. We also realized that radiant heating in the flooring would be essential to ensure this space would stay warm through the winters. About 1/3 of this kitchen does not have a basement or a foundation underneath it, and that leads to very cold floors and a very cold space on those very cold Chicago winter days and nights.

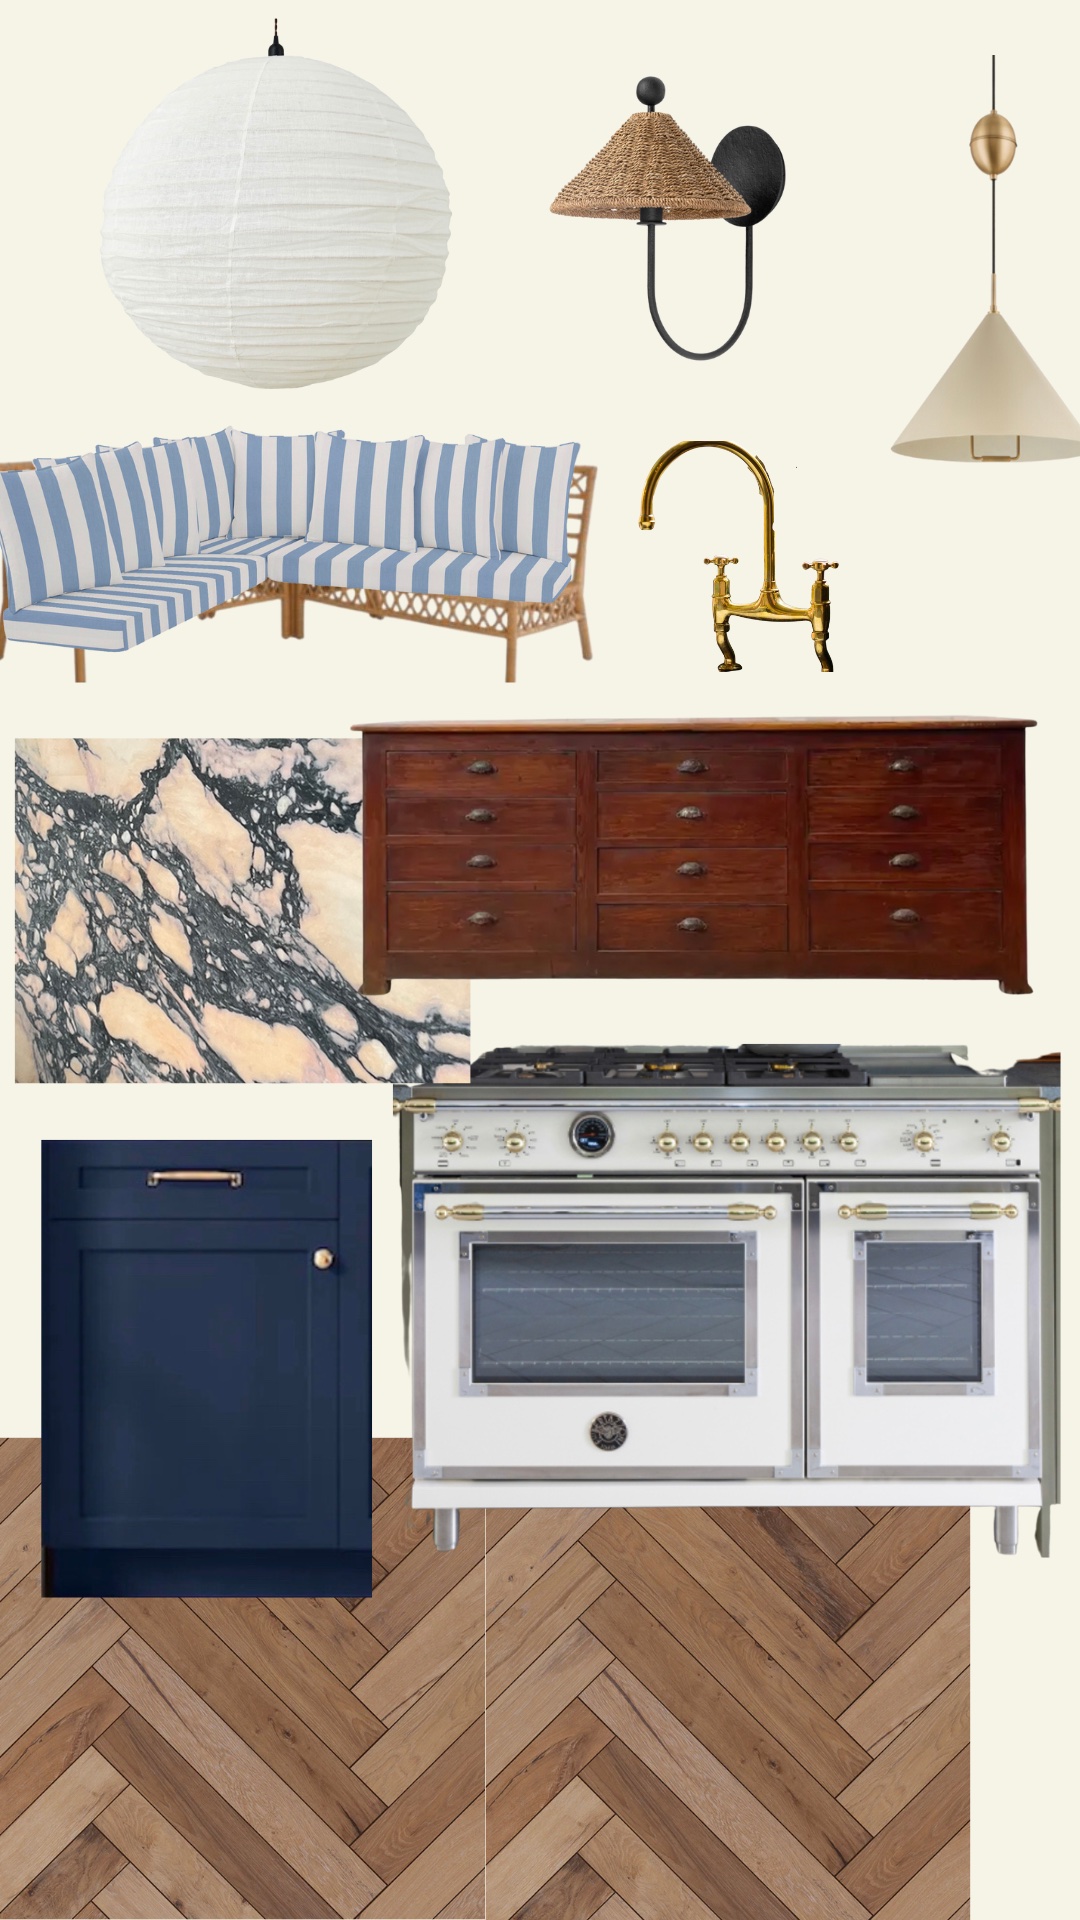
MOODBOARD
Moodboarding is always the first stage of any room I tackle. It’s an incredibly helpful tool to make sure that your color schemes and styles work well together, and I find this to be especially important if you work in an eclectic style as I do. This moodboard went through several different iterations, but the one I am sharing with you now is the final version.

Appliances
So, what did I choose first? As with any room, I choose the most difficult to replace/highest priced items first and work from there. In the case of a kitchen, this was our appliances. It has been a dream of mine to work with Bertazzoni for a long time, and I am still pinching myself that we will be working with them on this kitchen. The Bertazzoni Heritage Series line has been on my mind for quite some time because of its masterful fusion of vintage and modern aesthetics. Initially, we were going to use their gas range but when we heard they were coming out with an induction version of the Heritage Series, we sprung for it (more on that in later blogs).
In our last kitchen, we had a royal blue range (that I loved), but this time around I wanted to bring the color into the space in a different way. Because of this, we settled on the Avorio (creamy white) color for the Bertazzoni Heritage Series products. It’s such a classic color that will certainly stand the test of time.

Counters
From there, I went stone shopping. I knew I wanted to bold, statement marble (yes, marble – more on that later, too) and the second I laid eyes on the Paonazzo Rose slabs at Terrazzo & Marble, I knew they were the ones. I initially had Calacatta Viola in mind for the counters, but I think this is why it is especially important to get yourself to that marble yard to physically see the offerings. While I did love the Calacatta Viola, the Paonazzo Rose felt a bit more fresh and unexpected, and every bit as beautiful as the Calacatta Viola.

Cabinetry
The next step was choosing cabinetry. We used IKEA cabinets in our last kitchen and, while I was impressed with the quality of the IKEA cabinetry for the price point, I did want to go with something a bit more durable. My goal for this kitchen is to give it great, classic bones that can be tweaked over time. For example, it is much more affordable to paint your cabinetry than to entirely replace it, so I opted for a classic silhouette with slab drawers and applied moulding doors that could easily be painted in the future if we tire of the color over the next decade. We chose Cabinet Joint, which is an online service to assist in ordering Conestoga cabinetry. The color we chose was Sherwin Williams Naval, both for its timelessness and because of how beautifully, yet unexpectedly it plays with the Paonazzo Rose counters. The image above shows the current state of the kitchen, along with the cabinetry being installed.

Flooring
The next step was choosing flooring. I did, for a moment, consider white oak cabinetry that I would have combined with a tile floor. The reason I didn’t is my mother. Her voice is always in the back of my head, telling me, “never install tile in a kitchen, it’s too hard on your feet and back while you cook and clean.” While, admittedly, my mother spends way more time in the kitchen than I do, I still couldn’t shake that voice and decided to go with colorful cabinetry and herringbone wood floors. Plus, all of the reasons I mentioned above regarding our existing tile floor made me want to avoid replacing it with more tile. Herringbone adds some beautiful patterned interest and has certainly stood the test of time, so the Divine Flooring Vernazza Farmhouse floors felt like a win-win.
Hardware
The hardware was also chosen for its timelessness. I’ve always been drawn to warm brass/gold tones and loved the way the warmth of the brass works with the counters and cabinets. I chose the Emtek Providence Knobs and Cup Pulls in the French Antique finish.

Island
We initially planned on doing the island in matching cabinetry to the rest of the kitchen, but something about it was just not sitting right with me. I think the island can be a moment to choose something unexpected and I just couldn’t shake the idea of an antique wood work table in lieu of an island of cabinetry. I cannot take credit for such an idea. Antique work tables standing in for traditional islands has been trending for a couple of years now, and I am so glad we decided to go that route. It did take me a very long time to source one with the right dimensions and aesthetics, but I finally found this one on the moodboard via Chairish. It did need to ship from France, but because I was willing to wait 15-16 weeks on delivery, the total cost for the worktable came in around $5500.
Lighting
The lighting, like the rest of the kitchen, I wanted to feel fresh and modern, yet timeless. The Troy Lighting Layton Wall Sconces I chose for over the marble counter. I love how artisanal they feel and I can just as easily picture them being here 30 years ago as I could 30 years from now. The Troy Lighting Fontana pendants for over the island were chosen for their sleek silhouette (I didn’t want them to be a statement piece) and their classic aesthetic.
Paint
I did a lot of back-and-forth over what color to paint the walls, but I ultimately decided to go with Farrow & Ball’s Wimborne White in their new Dead Flat finish for the walls. I chose to go white because, well, there is a lot of color going on in the kitchen already and repainting down the road would be the easiest way to change up the vibe. I’m not always one to go with the safe choice, but this time around it felt like the right choice.
FLOORING
I am going to break up the flooring discussion into two sections, the first being a discussion of the heated flooring and the second section tackling the herringbone floors.
Heated Floors
One of the big motivators for prioritizing a kitchen renovation was the fact that our kitchen was about 10 degrees colder than the rest of the house. That may not sound like a huge deal, but when you’re dealing with Chicago winter temps, it actually is a really big deal. Aside from the fact that we knew we were losing so much heat through our floors and it was incredibly inefficient, we were also just downright COLD whenever we’d be in the kitchen from December through March.
We were losing the heat for two reasons: 1. the back half of our kitchen was an extension on the house and has no basement or foundation under it and 2. The tile floors would get so cold that you literally could not go in the kitchen without boots because the cold would cut right through your winter wool socks. So, we knew we needed to revamp our kitchen heating system and because we knew we were losing the vast majority of the heat through the floors, heated flooring seemed like the best option (besides, who doesn’t love heated floors?).
We’ve DIY installed heated flooring twice before, once in our attic and the other time in our powder room here at this house. Each time we’ve had to tackle it in a little bit of a different way. Essentially, you have two options for heated flooring: 1. hydronic (hot water) and 2. electric subfloor systems. For this project, we went with electric for two reasons.
The first was the ease of the install process, and the second was the flexibility of the products provided. We used the brand, Warm Up, as they multiple options for different subfloor and finished floor materials and applications. We are planning to use subfloor heat in a number of rooms, especially because we live in a very old home with spotty insulation in certain areas and have to stay warm through the Chicago winters.
The cost is relative the the system of the room and the type of wire used (120 or 240V). For the kitchen we used the Warm Up Stickymat. Which has the wire already taped onto a mesh mat. This allows for a low profile and an easy install. It is worth noting that the stickyness of the mat could be improved as the corners kept pealing up and making it difficult when pouring the self-leveling compound over it. The total cost of materials including thermostat, wire and self leveling compound was approximately $3,500 for around 400 square feet of heated space.
Herringbone Floors
As discussed earlier, we opted to go for wood instead of tile, mostly because it is a bit more giving underfoot. We needed to choose a hardwood floor that would be compatible with the heated flooring and I also knew I wanted herringbone (which can be a challenging install with heated flooring). The reasoning is that the easiest way to install herringbone is with nails, but with the heated flooring beneath, nails were not an option.
One day while perusing Instagram I saw my friend Reem ( @reems_design ) sharing the installation of her gorgeous new herringbone wood floors from Divine Flooring, and I knew they were exactly what I was looking for. I loved the white oak finish, and engineered flooring is a perfect option for a kitchen as it is much more scratch proof, waterproof and durable than 100% wood flooring. The engineered floors from Divine do, indeed, use real white oak for the top layer, but engineer the layers below to give the floors this added durability. Plus, they do not need to be finished or refinished, which for anyone who has finished floors in their home before knows, it can be a very enormous and very costly pain.
The flooring I chose, specifically, was the Farmhouse Vernazza European White Oak Herringbone floor. The stunning white oak, combined with the white herringbone planks were exactly the aesthetic I was going for, and these floors are even more stunning installed. I also love that I don’t have to worry too much about dirty kid feet, scratchy dog paws or wine spills since these floors can really hold up to a whole lot.
Another huge factor that played into my decision to go with the Divine Flooring herringbone floors was the fact that the white oak has such versatile tones, playing equally well with warm or cool colors. Having that versatility in our flooring will allow us to easily change up the paint cabinet colors or the wall cabinet colors down the road if we’re looking to give our kitchen a budget overhaul down the road.
Stay tuned for the next blog in the Kitchen 2023 series, which will tackle a discussion of the cabinetry, hardware and counters.


I’m so excited and can’t wait to see your kitchen done. That stove 😍 Also, love the blog! Glad I’m back to wanting to read these! IG had me addicted to just watching stories but I need brain stimulation at my age. Lol!
Haha Mimi I totally get it! Blogs are so useful for links and longer explanations… and thanks so much!
So inspiring. Gotta get going on my kitchen this year (waiting for my post college working from home child to leave). Going to use the cabinet company suggested by you. I keep eyeing the IKEA ones but know the long term issue. Cant wait to see the results and watch Insta,.
Totally get that! IKEA can be great, but going for a little better quality that will last longer is even better 🙌
[…] like more information on these very gorgeous Vernazza Herringbone floors from Divine, check out this blog from the kitchen […]